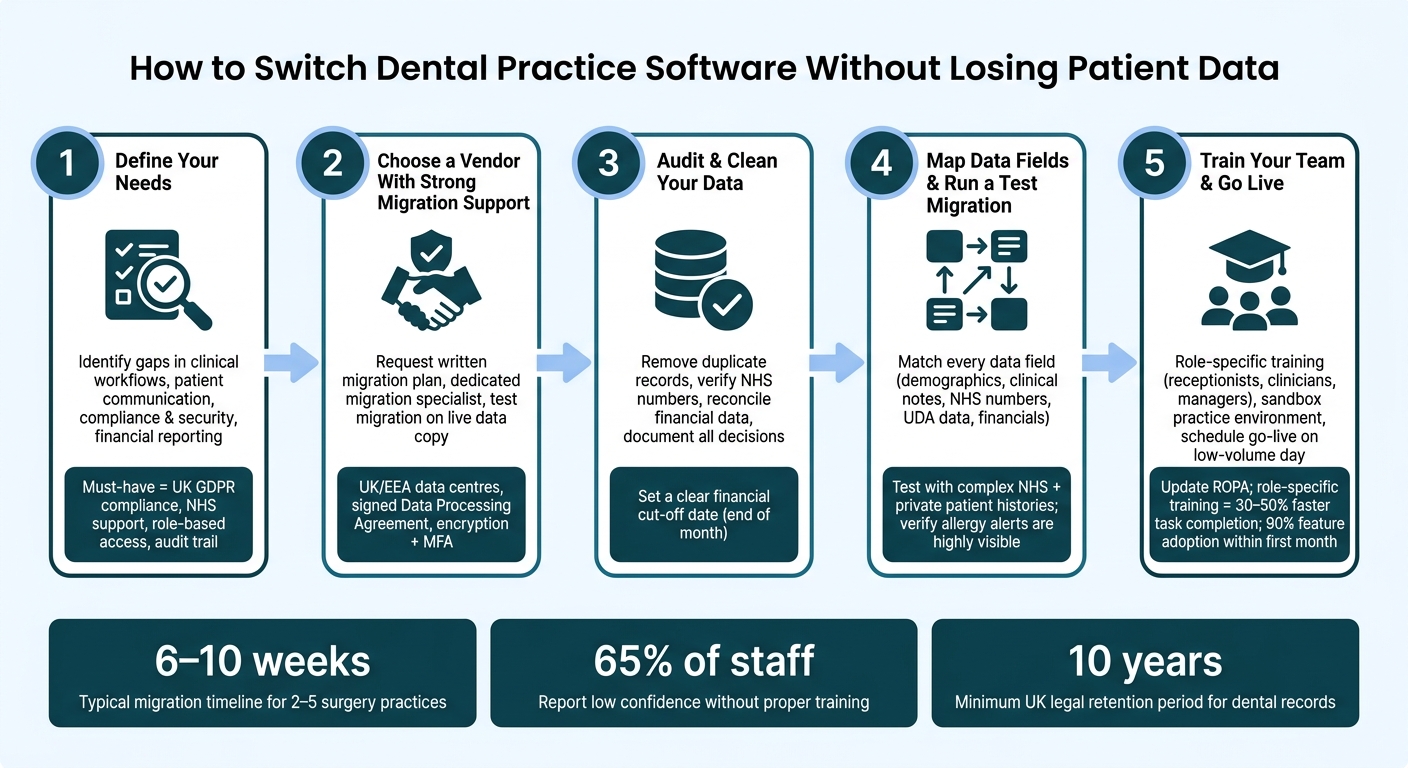
How to Switch Dental Practice Software Without Losing Patient Data
Switching dental software can seem overwhelming, but with the right approach, it’s manageable and worth the effort. Here’s what you need to know:
- Why Switch? Outdated systems can risk compliance with UK GDPR, disrupt patient care, and leave your practice vulnerable to cyberattacks. Modern cloud-based software saves time, improves efficiency, and ensures data security.
- Key Steps:
- Common Mistakes to Avoid: Rushing the process, neglecting financial data, and underestimating staff training needs can lead to disruptions.
Switching software doesn’t have to disrupt your practice if you plan carefully, involve your team, and work with a reliable vendor.
What Switching Dental Software Actually Involves
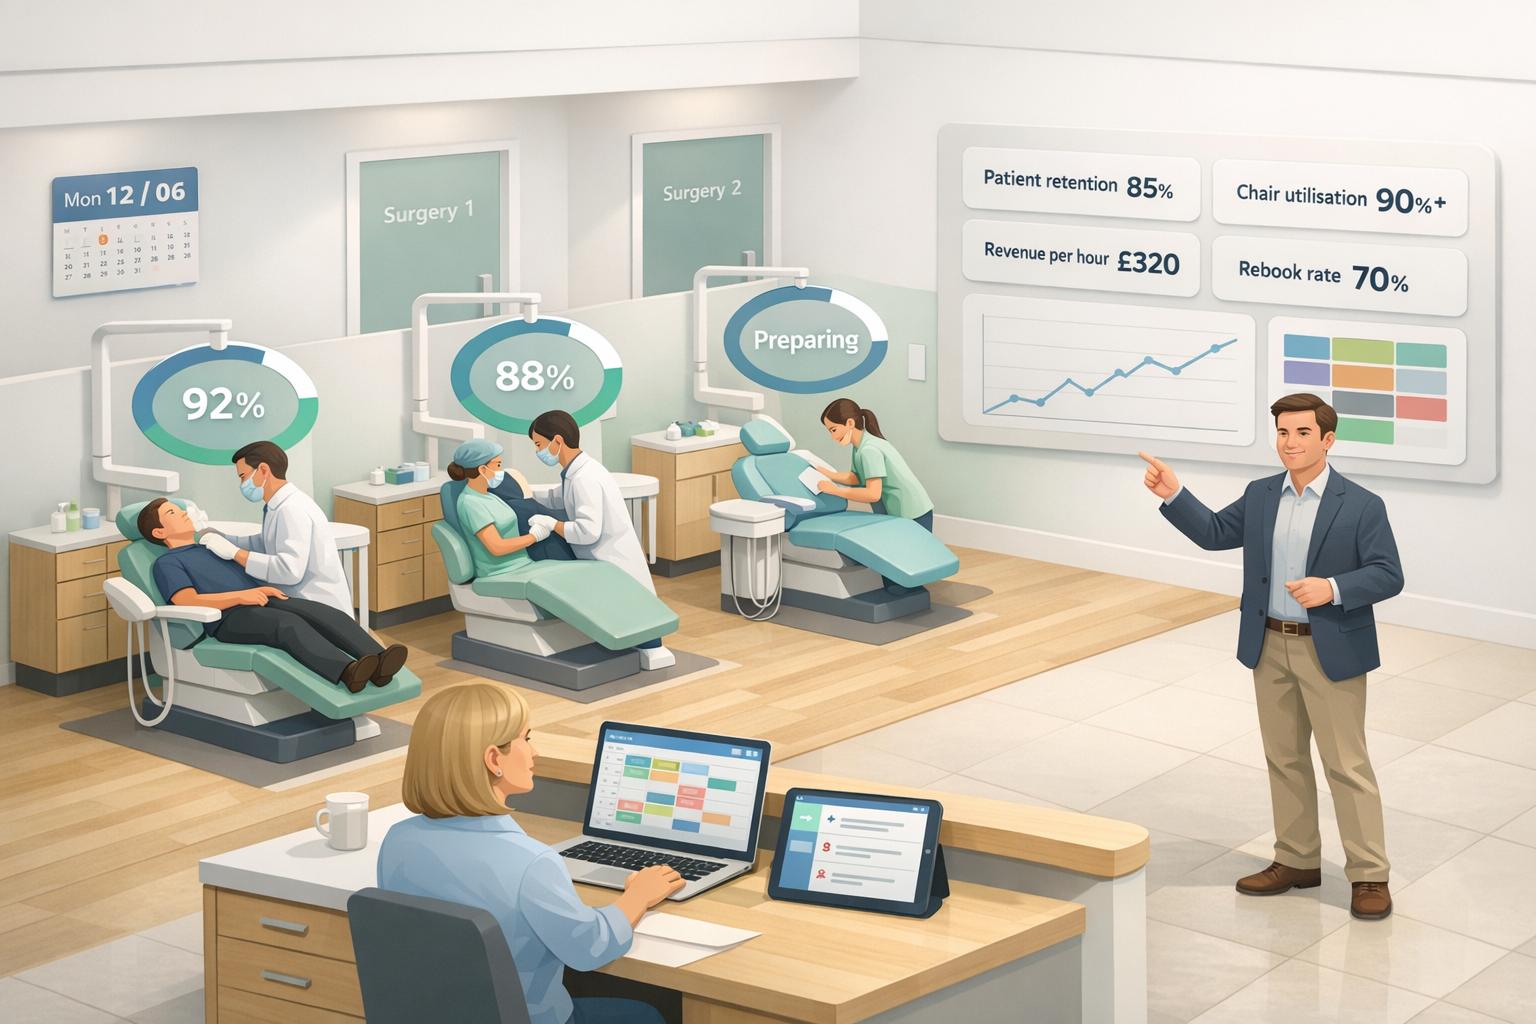
Switching dental software is a multi-step process that typically takes several weeks. At its core, it involves transferring patient records, clinical histories, financial data, and appointment schedules from one system to another.
Key Steps in the Migration Process
The migration process follows a structured approach. It begins with exporting essential data, such as patient demographics, NHS numbers, treatment histories, alerts, recall dates, and financial records, in standard formats. After this, data cleaning is crucial: this step involves removing duplicates, fixing formatting errors, and verifying critical safety details.
Next, you map data fields from the old system to the new one. For instance, mismatches like “DOB” versus “Date of Birth” can lead to import errors, so careful alignment is essential. Once the mapping is complete, a test migration is performed in a sandbox environment, usually three to four weeks before the go-live date. This trial run ensures the migration process is accurate and highlights any potential issues before the final switch.
Before the live migration, a full backup is completed the night before. The actual migration typically takes place over a weekend to minimise disruption. The first week after going live is critical for monitoring: ensure recalls are functioning correctly, NHS claims are processing without issues, and appointment bookings are working smoothly.
Understanding and following these steps is essential, especially given the stringent requirements for UK dental practices.
Why This Matters for UK Clinics
The importance of a well-executed migration cannot be overstated for UK dental practices. Patient records fall under special category data as defined by the Data Protection Act 2018, which means they must be handled with the highest level of security. Missing medical alerts or unlinked radiographs aren’t just minor errors - they can directly impact clinical decisions and compromise patient safety.
Additionally, there are financial and regulatory implications. NHS practices rely on uninterrupted access to FP17 submission workflows and UDA tracking. Any disruption could delay NHS claims and risk breaching UK retention laws. Dental records must be retained for at least 10 years under UK law, so ensuring they remain accessible during the transition is non-negotiable. Maintaining read-only access to the old system for at least three months after the go-live date provides an added layer of security, giving the team time to adjust while ensuring no critical data is lost during the switch.
How to Switch Dental Practice Software Without Losing Patient Data
@figure {How to Switch Dental Practice Software Without Losing Patient Data} :::
Switching dental practice software can feel overwhelming, but breaking it down into clear steps ensures you don’t risk losing patient records, disrupting NHS workflows, or derailing daily operations. Here’s how to make the transition smoothly.
Step 1: Define What You Need From New Software
Start by identifying what your current system lacks. Group these issues into categories like clinical workflows, patient communication, compliance and security, and financial reporting. Then, turn those shortcomings into specific requirements for your new software.
For instance, if generating NHS claim reports takes hours, look for a system with automated NHS billing and one-click FP17 reporting. If recall reminders are sent manually, prioritise software with built-in automated SMS or email reminders.
Once you’ve outlined your needs, categorise them as must-have, should-have, or nice-to-have. For UK practices, UK GDPR compliance, role-based access controls, NHS and private fee schedule support, and a full audit trail are non-negotiable. Features like cloud access, online booking, and integrated card payments might fall under should-have. Make sure to gather input from your entire team - dentists, receptionists, and managers - so no essential feature is overlooked.
Step 2: Choose a Vendor With Strong Migration Support
Not all vendors offer the same level of migration assistance. Some provide basic tools and leave you to figure it out, while others offer a managed service to ensure your data is transferred accurately and completely.
Ask potential vendors for a written migration plan, including milestones and timelines. Ensure they provide a dedicated migration specialist and conduct at least one test migration using a copy of your live data. This helps identify any issues before the final switch.
Check that the vendor’s data centres are located in the UK or EEA, and confirm they comply with UK GDPR by providing a signed Data Processing Agreement. Features like encryption, multi-factor authentication, and regular backups are crucial for safeguarding your data.
Some platforms, such as Remedico, include comprehensive migration support as part of their standard offering. This includes full patient data transfer, backups, free setup, and a dedicated support contact. Remember, your practice remains the data controller under UK law, so if anything goes wrong during migration, the responsibility ultimately falls on you.
Step 3: Audit and Clean Your Data Before You Move
Before exporting your data, take time to clean it up. Run reports in your current software to identify duplicate patient records, missing NHS numbers, outdated contact details, and incorrect recall intervals.
Carefully merge duplicate records, keeping the most complete version. Reconcile financial data with bank statements and card payment records to establish a clear cut-off date - ideally at the end of a month. Address unallocated credits and flag bad debts to avoid carrying unnecessary clutter into the new system. Document every decision you make during this process. This way, if patient counts or revenue figures appear slightly different in the new system, your team and accountant can understand why. With clean and reconciled data, you’ll be ready to map your system fields.
Step 4: Map Data Fields and Run a Test Migration
Data mapping is one of the trickiest parts of migration. Work with your vendor to create a document that matches every key data point in your old system to its equivalent in the new one. This includes patient demographics, medical histories, allergies, clinical notes, charting, imaging, appointment history, NHS numbers, UDA data, and financial records.
If a direct match doesn’t exist for some data, decide how to handle it. Options include creating a custom field, attaching the data, or storing it in a read-only legacy system. Once the mapping is finalised, run a test migration using a sample set of data. Include NHS and private patients with complex histories to ensure the system handles all scenarios.
Have both clinical and reception staff review the test migration, paying special attention to allergy alerts and medical flags - these need to be highly visible, not hidden in notes. Verify critical elements like UDA allocations, FP17 linkages, and NHS number accuracy to ensure everything aligns with NHS requirements.
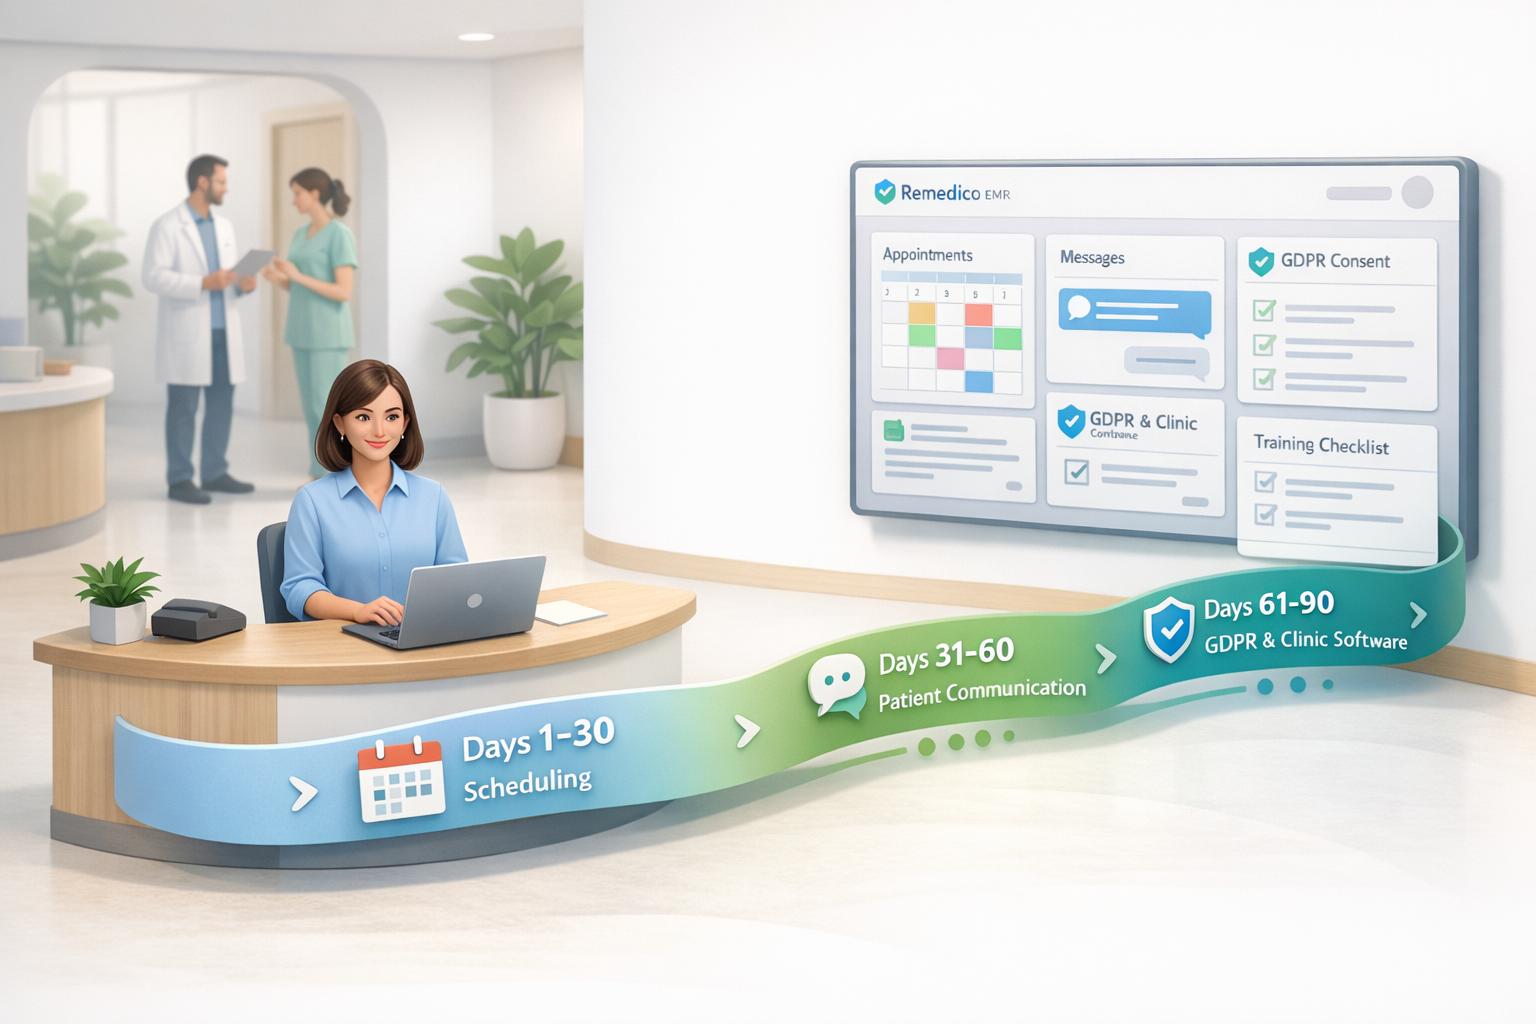
Step 5: Train Your Team and Go Live
Training is essential, and it should be tailored to each role in your practice. Receptionists need to practise booking appointments, managing recalls, and processing payments. Clinicians should focus on charting, clinical notes, and treatment planning. Managers must learn how to run reports and manage user permissions. A sandbox environment with test patient records is ideal for hands-on practice without affecting real data.
Schedule your go-live during a low-volume period, such as a Friday afternoon or weekend. Keep appointments light for the first few days, and have a designated super-user available to assist colleagues. On launch day, run immediate checks: confirm the appointment book for the upcoming week, ensure recalls are active, and compare financial reports with your old system. Finally, update your Record of Processing Activities (ROPA) to reflect the new software and any additional data processors.
Taking these steps ensures a seamless transition, keeping your practice running smoothly and maintaining your focus on patient care throughout the process.
What Most Clinics Get Wrong When Switching Software
Even with a well-thought-out plan, many practices still trip over the same hurdles. Recognising these common mistakes can help you steer clear of them.
Not Allowing Enough Time for Migration
Rushing through the migration process can lead to serious problems with your data. For a typical UK practice with 2–5 surgeries, the entire process - from the initial data audit to going live - usually takes 6–10 weeks. And that’s assuming there are no significant issues with legacy data or third-party integrations.
Skimping on validation can result in incomplete records, broken links between patients and NHS claims, or even incorrect account balances. These errors often become apparent only after you’ve gone live, making them harder to fix and more disruptive to your operations.
Understanding these timing challenges is essential, especially when dealing with financial data migration.
Ignoring Financial and Reporting Data
Many practices focus heavily on clinical records while overlooking financial data, which can lead to major headaches. If patient ledgers, aged debts, and UDA records aren’t properly updated, financial reporting becomes skewed, and NHS contract monitoring can be delayed.
Issues like associate pay calculations, month-end reporting, and NHS contract tracking can quickly spiral if fee schedules, payment histories, and UDA positions aren’t carefully mapped and reconciled before the switch.
To avoid this, run a side-by-side reconciliation before shutting down your old system. Compare key figures like total outstanding patient debt, credit balances, UDAs delivered by contract, and at least one month of daily takings reports. Only proceed once these numbers align - or document any agreed variances in writing.
Underestimating Staff Resistance
While technical and financial details are important, the human aspect can make or break your transition. Long-serving staff may worry about losing their efficiency with the new system, and this anxiety often shows up in subtle ways that can derail the project.
Without early involvement, 65% of staff report low confidence in using new software without proper training. Practices that skip adequate preparation can see up to 30% of calls go unanswered, as staff struggle with workflow confusion. This can lead to reliance on paper notes, delayed data entry, and bypassing safeguards - all of which compromise compliance and data accuracy, even if the technical migration is flawless.
The solution? Bring staff into the process early. Appoint role-specific champions, clearly explain the benefits (like fewer manual NHS claims, automated recalls, and less double-entry), and focus on hands-on training with practical, real-world scenarios. Role-specific training can help staff complete tasks 30–50% faster than generic system overviews. Practices that prioritise structured onboarding often achieve 90% feature adoption within the first month.
Key Takeaways for a Smooth Software Switch
Switching software can feel overwhelming, but with the right approach, it doesn’t have to be. Here’s what you need to keep in mind to make the process as seamless as possible.
Planning is everything. Treat the migration as a project, not a last-minute weekend task. Clinics that take the time to plan report fewer disruptions and a smoother transition overall.
Data quality matters. Before exporting your data, clean up your records. This means removing duplicates, fixing NHS numbers, and archiving inactive patients following UK retention rules. Once that’s done, run a test migration. Compare a sample of critical records from the new system with your old one to ensure accuracy. Skipping this step is where most data issues arise.
Don’t overlook your financial data. Fee schedules, UDA positions, outstanding balances, and payment histories all need to be carefully mapped and verified. A side-by-side check between systems can help catch errors before they become bigger problems.
Training your team is crucial. If your staff isn’t confident on day one, productivity could drop by as much as 10–20%. Tailored training sessions and a checklist for each role can make all the difference. Practices that prioritise structured onboarding often see strong adoption within the first month.
With Remedico, you’re never on your own. From secure data migration with full backups and free setup to role-specific training and round-the-clock support, the platform is designed to ease the burden on your team. Tools like Patient Flow™, Retention AI™, and the Smart Calendar aren’t just new features - they simplify the day-to-day running of your practice once you’re live.